The REX 6000 does not handle Outlook folders the way Outlook
handles them. In fact, it pretty much ignores them.
Here are some detailed
instructions on how to set up Outlook Contact and Notes folders to sync to
your REX. If you haven't done that yet, make sure you do before you
sync.
Once you've set it up properly, you can sync from Outlook
folders to the REX, but Contacts and Memos (Notes in Outlook terms) are not
separated by folder on the REX! The REX does not use folders to separate
Contacts or Memos the way Outlook does. That's the bad news.
The mostly good news is that the REX 6000 does support filtering
by Category within Contacts and Memos (not Calendar or Tasks, however).
Categories are an attiribute you can assign to pretty much any object in Outlook,
including Contacts, Memos, Calendar Events, Tasks, etc. You can even assign
multiple categories to objects. Anyway, when you are on the Contacts or Memos
screen on the REX you can tap on a button at the top left of the screen (see
below) on the screen to display a drop-down list of categories to choose from.
When you select a category, only the Contacts or Memos assigned to it appear
in your list. Works quickly and seems to be accurate. So if you take a moment
to assign categories to your Contacts and Memos in Outlook, you are probably
going to be OK.
Categories on the REX 6000 are also specific to the type
of object. If you use a category such as "Books" in your Memos,
but not in your Contacts, then you'll only see the "Books" category
listed in the drop-down when you on the Memos screen. This is nice, because
if you have a lot of categories the Category sort list gets longer than the
REX screen and you have to start scrolling in it - not effecient.
You can apply categories in Outlook to many objects at a
time. Simply highlight the Contacts or Memos you want to categorize (by using
Shift-click or Ctrl-click to select a large block, or objects set at random
in a group) and then right click and select "Category" from the
context menu.
IMPORTANT NOTE: It is worth
a moment or two (maybe many more) of your time to review, refine, and apply
your categories to your Contacts and Memos in Outlook before your first sync
w/the REX 6000, so you have a manageable number of categories, and so that
each object has a category assigned to it. This makes finding them on the
REX infinitely easier.
Of course, if you don't mind scrolling through your Contacts/Memos,
etc., in one big lump, you don't need to do anything at all.
To manage categories in Outlook:
1. Keep the number of Categories in Contacts and Memos
to a reasonable number. If you have a lot of categories (say more than
six or seven) then the drop-down category list you select categories from
will likely extend below the end of the screen, and you'll have to scroll
up and down to find the categories you need. Can be tedious. So if possible,
keep your Categories to six or seven at most. For example, my Contacts have
the following categories:
- All Memos (default)
- No Category (the REX seems to always put this there)
- Club Stuff
- Holiday Cards
- Personal
- Work
- Yellow Pages
It looks like there's room for maybe one or two more categories
before the list wouldn't fit on the screen. Of course, if you don't mind scrolling
down through a longer list, no worries - you can have as many Categories as
you like.
2. Categories are easy to create on the REX, and time-consuming
to remove. Once you have sync'd and your categories are on the REX, simply
deleting them from Outlook and syncing won't remove them from the REX. Even
using REX Tools to delete all Contacts on your REX won't remove the categories
- they'll stay behind, all by themselves! There are two ways to remove categories
from the REX 6000:
- Use the REX 6000 category delete function. When you select
a contact to view the details, and then select "Modify" and then "Category"
a list of categories is displayed. You can then use that screen to apply
or remove categories from the contact, or to add, modify, or delete categories.
However - deleting a category from the REX takes about 15 seconds
(time between confirming deletion and screen coming back). So - I would
take the time to set up categories in Outlook per instructions above before
you sync for the first time. If you do end up with a few spurious categories
on the REX they are easy (if time-consuming) to delete or modify.
- Use REX Tools to "initialize" the REX 6000.
This will clear your category list completely and allow you to start over.
However, this also removes ALL DATA from the REX, and removes all your Intellisync
configuration settings. You'll be back to where you were when the REX arrived
and you just finished installing the software. Maybe a cleaner start than
you wanted, but that's how it works right now.
If you live in and/or travel to one of the
cities included on the REX World Clock as it comes loaded from Xircom, you
may not need to make any updates to the city list on your REX World Clock.
If your city isn't listed, or you just want to be able to check the time in
some obscure city on your REX, then read on!
One way to add or remove cities on your REX
is by editing the REXWorldClock.CSV file that the Intellisync software puts
in your REXTools directory during installation. Any cities in the REXWorldClock.CSV
file are placed on your REX when you use the initialize command in REX Tools.
(There is another way to add cities to your REX World clock, but we'll get
to that a bit later.)
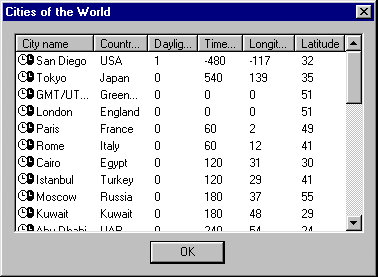
To see the current list of cities on your REX (and determine
if you even need to bother with this) you can either use REX Tools or look
on the REX. If you use REX Tools, insert the REX in the cradle or PCCARD slot,
and start REX Tools. Then select "Options/Cities of the World" from
the menu to display the current listing. Looks like this:
To look on the REX, click on the REX World Clock icon and
then click on the city listed to open a scrollable list of cities.
If you decide you want to add more cities to your REX you
will need to find out the information in the colums above - City, Country,
Daylight Savings Time On/Off (you can change this on the REX), Time from Greenwich,
Longitude, and Latitude. If your city is very close to an existing one, you
may want to consider just changing a name - less time and work on your part
looking up longitude/latitude info.
In fact, we have already captured this information for many
cities around the world:
- You can look for your city information in a text file
that contains the necessary information for over 150 major cities! (Thanks
to Bill for providing this!) Click here
to view the file online. (Select Back to return to this page when you're
done.)
- Also, thanks to Maarten, you can click
here to open a web page that will allow you to find the longitude/latitude
for your city if it isn't on the lists above. Type in the first few letters
of the city or place you're interested in and you'll be given a list of
matching locations and their latitude and longitude. Click on the correct
match and you'll get the location identified on a world map along with the
current time.
To make things even easier for you, you can use (either as-is,
or edited by you) either of two "ready-to-use" city lists to update
your REX. In case you want to return to the original cities, you should save
a backup of the original rexworldclock.csv file that is in your REXTools directory.
Here's a
copy
of the original REXWorldClock.CSV file that is comes with the Intellisync
software, in case you forgot to back up yours. Rename it to REXWorldClock.CSV
if you want to use it.
Below are links to the two files and a summary of the two
methods. For step-by-step update instructions, read on below the summaries:
- You can use this
ready-to-use
REXWoldclock.CSV file with over 160 cities in it! (Thanks to Preston
for putting this together from Bill's list above.) You can download and
place this CSV in your REX Tools directory. Then you initialize your REX
to add all of the cities in the CSV file to your REX. Remember, initializing
also removes all data from your REX, and all sync settings from Intellisync.
Note: If you want to keep the original REXWorldclock.CSV file that comes
with the REX, back it up first.
- You can load this
worldclock.rex
file (provided by Helge) to your REX using REX Tools. (No initializing required.)
It contains 136 cities from around the world. (You can add additional cities
to this file if you want to.) Simply start REX Tools and use the "File/Open"
command to update the REX.
Of course, you can also edit the CSV
or REX files if you want to pare down or add to the list of cities.
Step-by-Step instructions for the two methods.
Method 1: Update REX World Clock by initialzing
your REX w/REX Tools
- Download and edit the REXWorldClock.CSV file (you could
also just edit your original one) with Excel (maybe easiest, as it keeps
all the columns straight), or Notepad, or any other text editor. Make sure
you save it back out in the same CSV (believe it means "comma delimited")
format - basically a simple text file w/a CSV extension.
- Once the file is updated (make sure you save it in the
REX Tools directory!) you need to select the "Tools/Initialize"
menu option in REX Tools and then wait a couple of minutes (more or less)
while the REX is set back to zero (no data) except for your new World City
information. Then you can reconfigure Intellisync and sync your data back
to the REX.
- Then - your city information is available on the REX when
you tap on the correct part of the map. Warning - the map is reasonably
accurate in terms of the results from tapping in a particular location,
but dont' expect it to be perfect. Sometimes I tap what I think is San Diego,
California and I get Denver, Colorado.
Easy? Nope. Fun? Not really. Satisfying in a geeky sort of
way? Hmmmm ... could be. <g>
Method 2: Update your REX World Clock
by loading Worldclock.REX to your REX using REX Tools (From Helge & Hernan)
To do this the easy way, follow the steps
below! (From Hernan)
"I was following Helge's and yours
mails about world clock. For myself and for others, I thought it will be
a good idea to setup a very basic and standard procedure for dummies. Basically
I merged your CSV file and Helge's discoveries and "subtracted"
the cities that are factory included. Follows the result I came up with...
Thanks to Helge Böhme, who discover
this procedure, and to Dana White's worksheet with world data, I built a
file that can add new towns into Rex world clock without intialize it."
The steps:
- Download the file "WorldClock.rex"
(Right click and select "Save Target As" in MS Internet Explorer.
Or, left-click and then copy/paste the contents of the page to a text
file.) Edit the file if desired.
- Copy it into Program Files\REX6000\REXTools
directory
- Plugin your Rex.
- Run the RexTools utility.
- When the RexTool's status bar shows
"Ready", click the File/Open menu option.
- Select the file "WorldClock.rex"
- Answer "yes" when it asks
you to confirm one data file to add.
- Wait a couple of minutes until the
status bar shows "Ready" again.
- Unplug your REX and enjoy more than
one hundred of new towns.
Here's some additional background for on the Worldclock.rex
method for those more technical. (From Helge)
"I don't know why nobody figured out
that before but it is possible to update the RexWorldClock DB without the
need to initialize the Rex. First you do a "Export Database" with
RexToolsBeta (DBID:8000) then you edit the file, add your own city. The
Format is: No City Country Savings TimeZone Longitude Latitude # String
String 0/1 GMT+/-minutes degrees degrees.
Note that the words are divided by <tab>s
and negative values are in twos complement. You can only add new items,
no deletion, no change. At last you delete all old items from the list so
only the new items are remaining (example
attached). This file you can upload as normal using RexTools.
You can choose any file name you want in
the export dialog (in my case it was clock.REX), you can edit this file
using any texteditor that can use and save <tab>s (e.g. the standard
Windows editor). Add the lines you want with new record numbers first, delete
all lines with old record numbers and store the file using the name you
want (in my case it was clock1.REX).
It's ASCII text (as are all DB exports
-- any non-printable characters are converted using the C excapes "\n",
"\0", "\xFF" etc.). Try it out for yourself and look at the files... "
REX Tools Beta (necessary if you want to
export the world clock file on your REX) is available on our Software
Updates page. Since Helge has provided a REX World Clock file for you
(see link in the 9 steps above) you can simply download that file, edit
it if desired, and then use REX Tools to load that file to your REX!
Method 3: Update the REX
World Clock using an add-in (from Waleed).
See here on our Add-ins
and other REX Programs page.